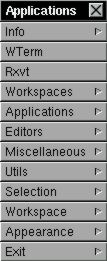
Different menus are available within Window Maker:
Menus provide a list of applications or commands for execution. They
can be used to launch applications, to get information, to configure
the workspace...
Menus are opened by right-clicking either in the "blank" area of the workspace or in a window's titlebar or in docked icons. The window list menu is the only one opened with the middle mouse button. With a two-button mouse, pressing both buttons at once usually does the trick. A number of keyboard shortcuts are provided. These shortcuts are indicated by the modifier key + letter shown to the right of a menu item.
The keyboard can be used to open and move through some of the menus. For instance, the root menu can be opened using F12 (default setting). The Up and Down arrow keys can then be used to navigate through the menu or the Left and Right arrow keys to jump between parent menus and submenus. Hitting the Enter key executes the selected item. the Escape key closes the menu or stops menu traversal.
Menus can be forced to remain open on the workspace by left-clicking the titlebar. This creates a close button on the titlebar.
The menu content is totally configurable, either using WPrefs.app or by editing the plain text menu file. Instructions on how to configure one or the other can be found in the WindowMaker directory of the distribution. To use WPrefs.app, menus must be in property list format (plmenu). A script is available to convert plain text menus to property list menus and it's called wm-oldmenu2new.
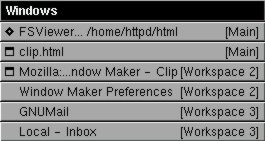
This menu lists all windows - whether active or inactive - in every workspace. The workspace containing each window is indicated at the right of the window name. The current focused window is marked by a diamond sign to the left of the window's name. Clicking any window in the list focuses and raises the corresponding window and moves you to the workspace where it's located.
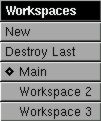
The first option creates a new workspace and automatically switches you to it.
The second option destroys the last workspace as soon as there are no windows opened in it.
Each workspace has a corresponding item in this menu. The active workspace is indicated by a diamond to the left of the workspace name or number.
Clicking a workspace entry switches from the current workspace to the selected workspace.
To change the name of a workspace, first "stick" the menu by left-clicking the menu titlebar. Then Ctrl + click the menu item to make it editable and type in the new name. Hitting Return saves the new name, hitting Escape cancels the operation.
Key bindings allow movement from one workspace to another. Usually Meta + (number). The Meta key is normally the "Alt" key, while (number) represents a number key that corresponds to the workspace number. For instance 1 can be the default workspace (workspace 1), 2 the second workspace and so on. Thus, Meta + 2 switches to workspace 2.
These key bindings can be set (or changed) from the keyboard shortcut dialog in WPrefs.app.
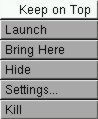
Clicking "Keep on top" places a check-mark beside that option,
which means that the icon will always be on "top" of
opened windows. If "Keep on top" is unchecked, windows will be allowed
to cover the icons in the dock. Selecting "Keep on top" for one icon
automatically affects all of the items in the dock. You cannot keep
just one docked icon on top of windows - it's all or nothing, one way
or the other.
"Launch" opens the application without double-clicking the icon.
"Bring here" unhides the application in the current workspace.
"Hide" hides the application or unhides it if already hidden. Unhiding opens the application in the workspace where it is located. (This option may not work if the application has it's own hiding menu option.)
"Settings" allows the modification of application path and arguments, the command line, and the icon used.
"Kill" closes the application immediately and should only be used if absolutely necessary.