
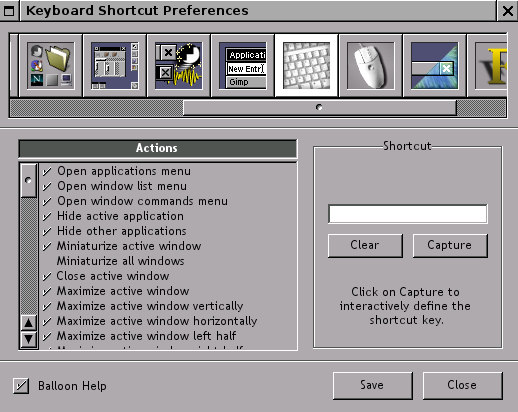
WPrefs.app is the heart of the configuration process in Window Maker.
Upon installing Window Maker and running it for the first time, the
WPrefs icon is already docked. By default, it's the one with the
GNUstep logo in the background and a few tools in the foreground
(although your distibution may use the plain GNUstep icon or something
enitrely different). Normally Linux distributions position WPrefs as
the second or third icon in the
Dock column by default, just above or below the terminal icon.


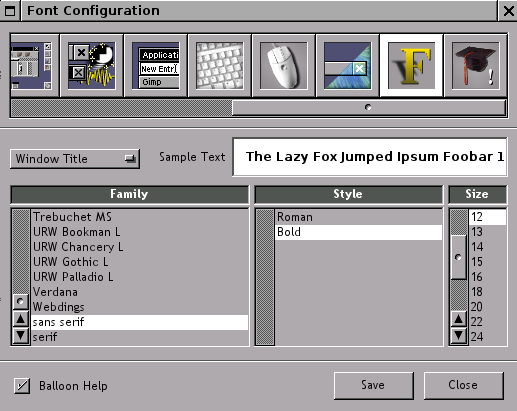
Double-clicking on this icon opens the WPrefs.app window. Across the top of the window there is a row of icons, each one corresponding to a group of settings options. There is a checkbox for balloon help on the bottom left of the WPrefs.app window. Most of the following is taken directly from the content of the ballon help dialogs.
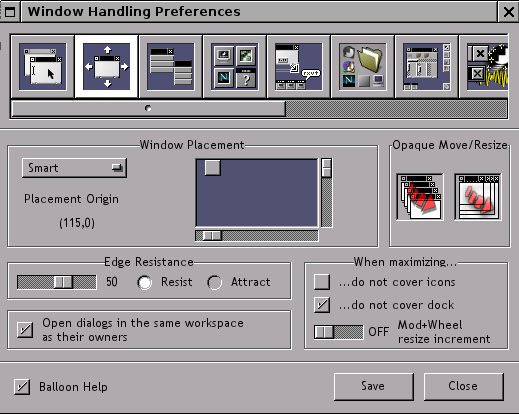
Window placement
You can use the sliders around the screen representation to modify the
original placement.
The gadget tells Window Maker how to order windows on the screen: Random, Manual, Cascade or Smart. Automatic is the default.
Edge resistance
To set the edge resistance and whether it resists or attracts windows.
According to the selection, windows resist or attract when moved
against other windows or the edges of the screen. The slider defines
the threshold. Some applications' title bars may disappear
at the top of the screen, with the window being too high for the screen
area. Setting the edge
resistance to "0" may solve this problem.
Open dialogs in the same workspace as their owners
Obviously, whether to force dialog boxes "spawned" by an application to
open in same workspace as their owners.
Opaque move/resize
Clicking on opaque move
causes windows to be moved with their contents visible. If not checked,
only the frame is displayed during the move. Opaque resize makes window contents
visible during resizing, otherwise only the frame is displayed.
When maximizing
This option allows the window to cover (or not) icons or the dock when
maximizing.
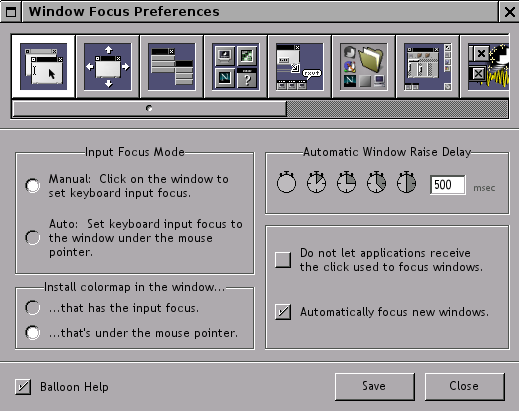
Input focus mode (two choices are available):
Manual - click on the window to set keyboard input
focus.
Auto - set keyboard input focus to the window
under the mouse pointer.
Install colormap in the window
Select either (a) install the colormap in the window that has the input
focus or (b) that is under the mouse pointer.
Automatic window raise delay
Setting the delay (in msec) for automatic window raising
Checkboxes
The topmost check box prevents applications from receiving the focusing
mouse-click (I don't know why you would use this, but some people
obviously find it useful).
The bottom checkbox allows you to choose whether newly-opened
application windows automatically receive the focus, or must be clicked
to gain focus.
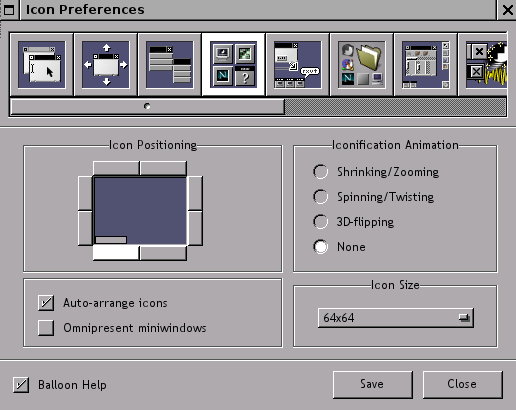
Set icon or miniwindow handling options.
Checkboxes
The topmost box enables/disables auto-arrangement of icons. The
bottom box places miniwindows for opened applications on all existing
workspaces (omnipresent).
Iconification animation
When an application's window is miniaturized, miniaturization animation style
offers four animation choices.
Icon size
Selects the size of the icons shown when a window is miniaturized and
for application icons. Dockapp developers usually assume that tiles
will be 64x64 pixels, so it's
probably a good idea to leave it at that size, unless you know you
won't be using dockapps.
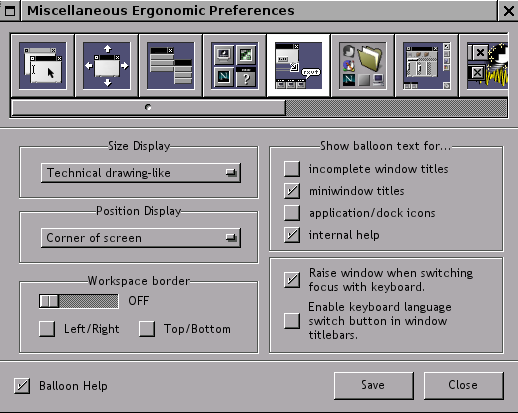
Size display
Window Maker provides a box that informs you about the size of a window
during resizing. You may choose to have this display (a) in the center
of the screen, (b) the center of the screen, (c) the center of the
resized window, (d) the side and bottom of the window as a technical
drawing-like size display or (e) not at all.
Position display
Same information as above but regarding the screen placement of a
window while moving (no technical drawing-like option).
Workspace border
You can set a small border for the workspace. This allows you to easily
access the clip (for instance) when windows are maximized.
Show balloon text for
Selecting
checkboxes displays balloon text for: incomplete window
titles, miniwindow titles, application and dock icons, or internal
help. This may be useful for new users but many people find having help
balloons pop out all over the desktop gets annoying quickly. I use the incomplete window title and the miniwindow title options and none
of the others.
Checkbox
The top check bos, if selected, raises a window when switching focus
with the keyboard. The bottom box enables a keyboard language selection
button on window titlebars (must have multiple keyboard maps/locales
defined - this is handy if you are working in multiple languages in
applications such as word processors, for example).
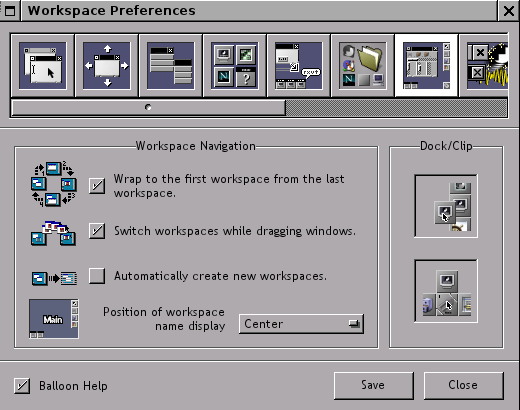
Workspace navigation
Selecting the first
checkbox allows switching to the first workspace when
switching past the last workspace and vice-versa. Selecting the second
checkbox allows windows to be dragged from one workspace to another.
Selecting the third checkbox
cause a new workspace to be created when windows are dragged off the
last existing workspace. A selection menu allows you to define where
the workspace name is displayed each time you move from one
workspace to another (or not to display the workspace name at all).
Dock and clip
Enables / disables the dock and/or the clip. I have seen some
interesting configurations using no dock but having the clip present.
For users who prefer a bottom or top "panel" of application launchers,
system monitors and other tools, this is a very valuable bit of
flexibility.

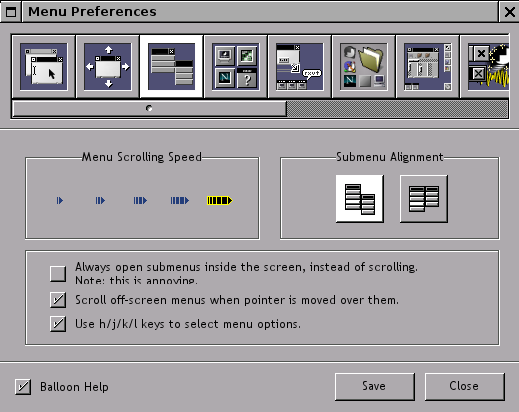
This panel sets icon slide speed, shade animation speed, smooth scaling and titlebar control (button) style. Animations and sound are also defined here.
Icon slide speed
Selecting the left icon gives the slowest result, selecting the right
one gives the fastest.
Shade animation speed
Same as icon slide
Smooth scaling
If selected, neutralizes pixelization effect on background images. The
side-effect is to slow down background image loading.
Titlebar style
To choose a more or less "NeXTish" titlebar. (The top version is
"newer," while the bottom left is ca. 1990 and the bottom right is ca.
1988.)
Animations
Selecting the animations icon enables animations for window
miniaturization, shading and so on.
Selecting
the superfluous icon enables "ghosting" of dock (when moved -
especially when moved from one side of the screen to the other) and
explosion
animation for icons you remove from the dock.
Dithering colormap for 8bpp
For 8-bit displays (anyone still have one of these?) this enables
dithering and changes the number of colors to reserve either for
applications or for Window Maker. The Default setting almost always
gives the best result.
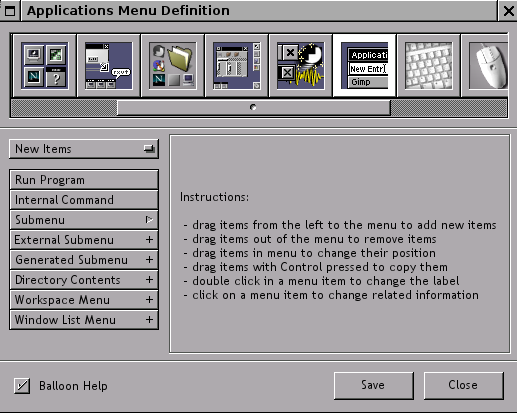
In this panel the applications menu and the commands to launch each application can be defined. This panel has been changed in version 0.63.and later. It now displays the actual menu thus allowing direct editing. This can be done only if the menu is in property list format. Menus in plain text format can't be edited in WPrefs. Check the README file in the Window Maker directory on how to use one or the other.
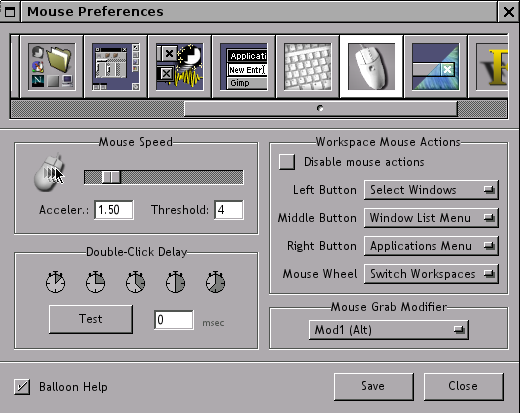
The default setting binds the right mouse button to the applications menu, middle button to the window list menu and left button to window selection (focus). Of course, with a two button mouse, the middle button binding will not work. However, on some OSes pressing both buttons at once gives the same result as the one obtained with middle button.
Starting from version 0.65 on, the mouse wheel can be used to switch workspaces. This is not default behavior and must be enabled here.
The mouse grab modifier represents the keyboard shortcut to use for actions like dragging windows with the mouse or clicking inside the window. Mod1 (Alt) is the default.
If needed, the defaults configuration file found in
$(HOME)/GNUstep/Defaults/WindowMaker can be edited by hand. This file
is a database with a property list syntax. When selecting an option in
WPrefs.app, it's written down into this file. When modifying this
defaults file, it's very important to follow the syntax.